
How can New App infect your computer?
Usually, New App roaming on the Internet together with freeware or shareware that can be easily downloaded and installed to your computer with no cost. So the authors of New App cooperated with the third-party companies and let New App hide in those freeware that computer users like to install to their computers. What's more, the authors of New App make use of the junk email attachments and send them to the innocent users to luring their clicking.
What can New App do to your computer?
It collect your online activities to analyze your shopping habits so as to show you ads based on your desire
It will shut down your other anti-virus and anti-spyware programs. And it will also infect and corrupt your registry, leaving your computer totally unsafe.
It can modify the homepage settings of your web browser, more commonly by reducing your internet security options. And the worse thing is it prevents you from changing them back.
It can drop you a lot of ads to cheat your money.
Instructions to get rid of PC New App Ads
Method 1: PC New App Ads manual removal
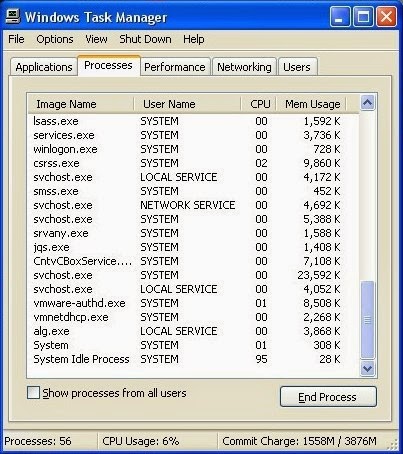
Step 1: Stop related running processes in Windows Task Manager first.
( Methods to open Task Manager: Press CTRL+ALT+DEL or CTRL+SHIFT+ESC or Press the Start button->click on the Run option->Type in taskmgr and press OK.)
Step 2: Remove any infection related program from Control Panel.
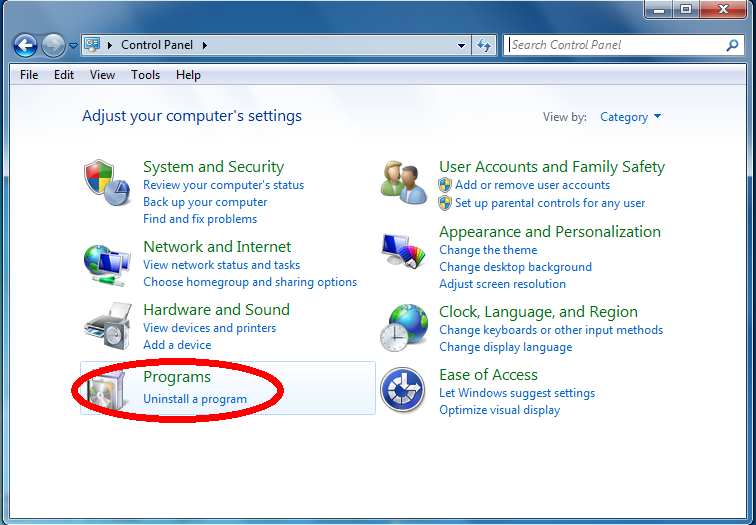
Windows Vista and Windows 7
1. Open the Start menu.
2. Click Control Panel and click Uninstall a program.
3. Remove the related programs.
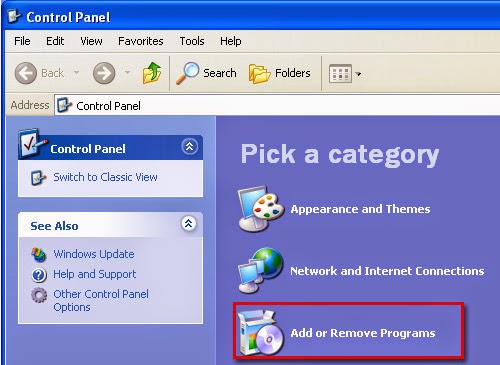
Windows XP
1. Open the Start menu.
2. Click Control Panel and then click Add or Remove Programs.
3. Uninstall related programs.
Windows 8
1. Press Win+R.
2. Type in control panel and click OK.
3. Select Uninstall a program.
4. Remove the related programs.
Step 3: Remove PC New App Ads extension or add-ons from your browsers.
Windows Vista and Windows 7
1. Open the Start menu.
2. Click Control Panel and click Uninstall a program.
3. Remove the related programs.
Windows XP
1. Open the Start menu.
2. Click Control Panel and then click Add or Remove Programs.
3. Uninstall related programs.
Windows 8
1. Press Win+R.
2. Type in control panel and click OK.
3. Select Uninstall a program.
4. Remove the related programs.
Step 3: Remove PC New App Ads extension or add-ons from your browsers.
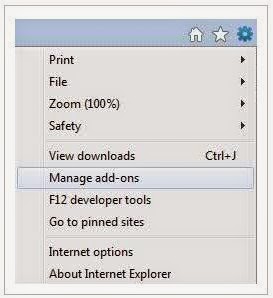
Internet Explorer
1) Go to 'Tools' → 'Manage Add-ons';
2) Choose 'Search Providers' → choose 'Bing' search engine or 'Google' search engine and make it default;
3) Select 'Search Results' and click 'Remove' to remove it;
4) Go to 'Tools' → 'Internet Options', select 'General tab' and click 'Use default' button or enter your own website, e.g. Google.com. Click OK to save the changes.
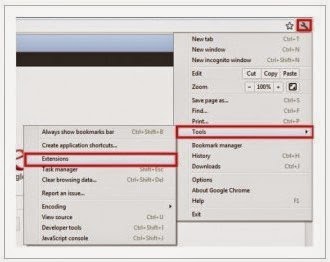
Google Chrome
1) Click on 'Customize and control' Google Chrome icon, select 'Settings';
2) Choose 'Basic Options'.
3) Change Google Chrome's homepage to google.com or any other and click the 'Manage search engines...' button;
4) Select 'Google' from the list and make it your default search engine;
5) Select 'Search Results' from the list remove it by clicking the "X" mark.
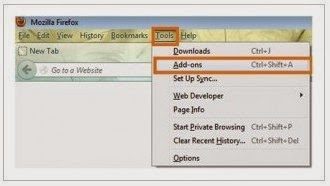
Mozilla Firefox
1) Click on the magnifier's icon and select 'Manage Search Engines....';
2) Choose 'Search Results' from the list and click 'Remove' and OK to save changes;
3) Go to 'Tools' → 'Options'. Reset the startup homepage or change it to google.com under the 'General tab';

1) Go to 'Tools' → 'Manage Add-ons';
2) Choose 'Search Providers' → choose 'Bing' search engine or 'Google' search engine and make it default;
3) Select 'Search Results' and click 'Remove' to remove it;
4) Go to 'Tools' → 'Internet Options', select 'General tab' and click 'Use default' button or enter your own website, e.g. Google.com. Click OK to save the changes.
Google Chrome
1) Click on 'Customize and control' Google Chrome icon, select 'Settings';
2) Choose 'Basic Options'.
3) Change Google Chrome's homepage to google.com or any other and click the 'Manage search engines...' button;
4) Select 'Google' from the list and make it your default search engine;
5) Select 'Search Results' from the list remove it by clicking the "X" mark.
Mozilla Firefox
1) Click on the magnifier's icon and select 'Manage Search Engines....';
2) Choose 'Search Results' from the list and click 'Remove' and OK to save changes;
3) Go to 'Tools' → 'Options'. Reset the startup homepage or change it to google.com under the 'General tab';
Step 4: Show all hidden files and clean all the malicious files.
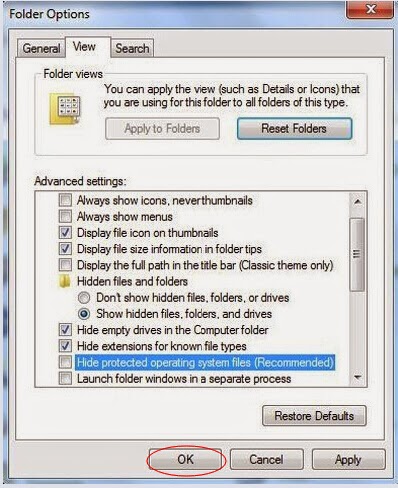
(1).Click the Start button and choose Control Panel, clicking Appearance and Personalization, to find Folder Options then double-click on it.
(2).In the pop-up dialog box, click the View tab and uncheck Hide protected operating system files (Recommended).
(1).Click the Start button and choose Control Panel, clicking Appearance and Personalization, to find Folder Options then double-click on it.
(2).In the pop-up dialog box, click the View tab and uncheck Hide protected operating system files (Recommended).
Step 5: Clear all the cookies of your affected web browsers.
Since the tricky virus has the ability to use cookies for tracing and tracking the internet activity of users, it is suggested users to delete all the cookies before a complete removal.
Google Chrome:
Click on the "Tools" menu and select "Options".
Click the "Under the Bonnet" tab, locate the "Privacy" section and Click the "Clear browsing data" button.
Select "Delete cookies and other site data" and clean up all cookies from the list.
Mozilla Firefox:
Click on Tools, then Options, select Privacy
Click "Remove individual cookies"
In the Cookies panel, click on "Show Cookies"
To remove a single cookie click on the entry in the list and click on the "Remove Cookie button"
To remove all cookies click on the "Remove All Cookies button"
Internet Explorer:
Open Internet explorer window
Click the "Tools" button
Point to "safety" and then click "delete browsing history"
Tick the "cookies" box and then click “delete”
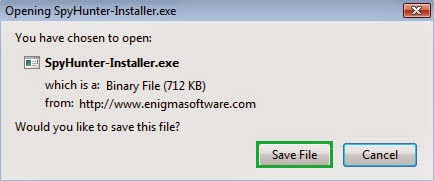
Method 2: Automatic Removal with SpyHunter
Step 1: Click the following button to download SpyHunter.
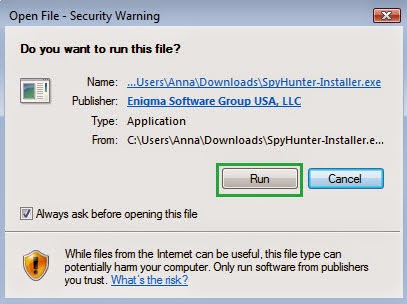
Step 2: Save it into your computer and click on the Run choice to install it step by step.
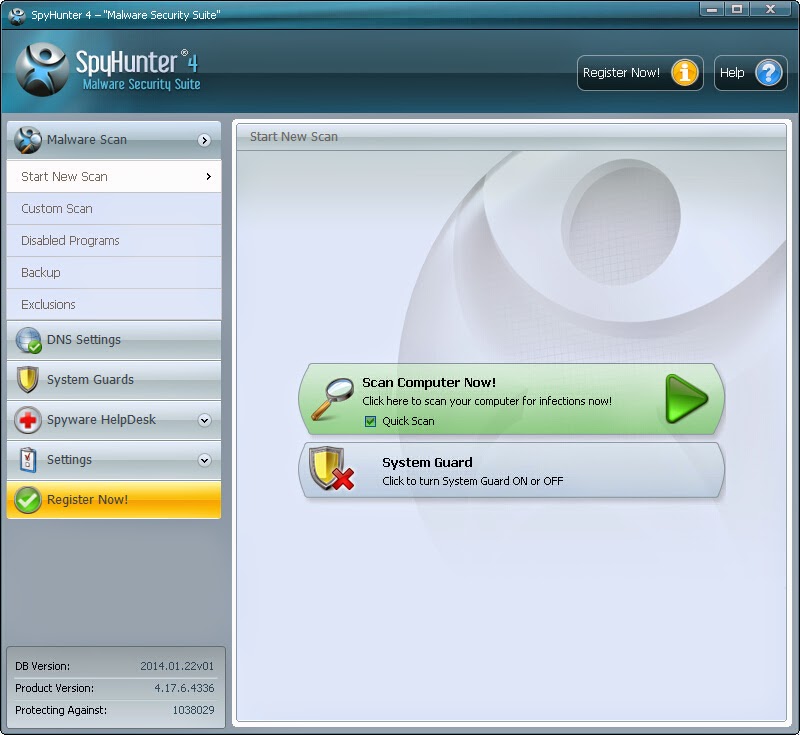
Step 3: Click Finish then you can use it to scan your computer to find out potential threats by pressing Scan computer now!
6158)AZRTJ6S.jpg)
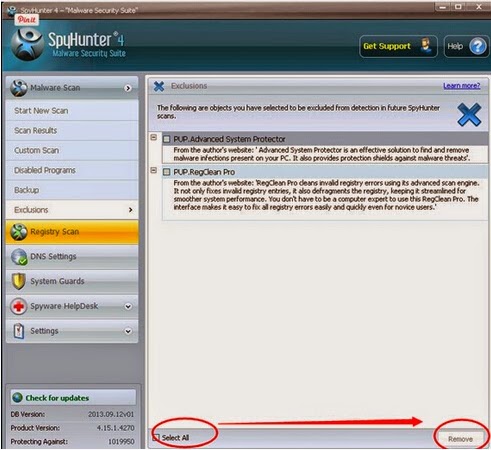
Step 4: Tick Select all and then Remove to delete all threats.
Guide to download RegCure Pro to optimize PC
If you are still worried about the left over of PC New App Ads and want to clean all the unwanted registry entries, it is recommended to use RegCure Pro.
Step 1. Install and launch RegCure Pro on your PC.

Step 2. Select "Yes" to download and install RegCure Pro.

Step 3. Click "Next" to continue.

Step 4. RegCure Pro will open automatically on your screen.

Step 5. RegCure Pro is scanning your PC for error.

Step 6. After scanning, choose the issues you want to fix.

Step 6. After scanning, choose the issues you want to fix.
Note: Manual removal PC New App Ads refers to key parts of computer system. Any error step may lead to system crash. If you don’t have sufficient expertise in dealing with the manual removal. Install Spyhunter can be your better choice, because it is capable of auto-detecting and removing viruses. You can also Download RegCure Pro to help you optimize the computer.

No comments:
Post a Comment